How to Root Ferns in Water: A Comprehensive Guide
Ferns are popular houseplants known for their lush foliage and unique textures. While many people propagate plants through soil, rooting ferns in water is a viable method that can be both effective and visually appealing. This article will explore the process of rooting ferns in water, the benefits of this method, and tips for successful propagation.
Understanding Ferns and Their Propagation
Ferns belong to a group of plants known as pteridophytes, which reproduce via spores rather than seeds. They are characterized by their feathery leaves, known as fronds, and thrive in moist, shaded environments. Propagating ferns can be done through several methods, including division, spore propagation, and cuttings. Rooting ferns in water is a popular technique for many indoor gardeners.
Why Propagate Ferns in Water?
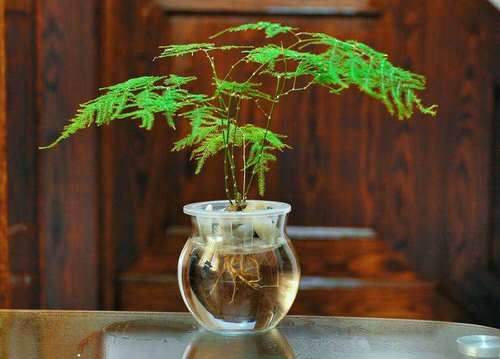
- Visual Appeal: Rooting ferns in water allows you to observe the root development, providing a clear view of the propagation process.
- Moisture Control: Water propagation can help maintain consistent moisture levels, which is crucial for ferns.
- Easy Monitoring: It’s easier to monitor the health of the cutting in water, as you can see any signs of rot or disease.
- Minimal Equipment: Water propagation requires minimal tools and materials, making it accessible for beginners.
Selecting the Right Fern for Water Propagation
Not all ferns are equally suited for propagation in water. Some of the best ferns to propagate using this method include:
- Boston Fern (Nephrolepis exaltata): Known for its lush fronds, the Boston fern is a popular choice for water propagation.
- Maidenhair Fern (Adiantum spp.): This delicate fern is well-suited for water propagation, but it requires careful attention to moisture levels.
- Bird’s Nest Fern (Asplenium nidus): This fern can be propagated in water, and its unique shape makes it a favorite among plant enthusiasts.
- Rabbit’s Foot Fern (Davallia spp.): This fern is known for its unique rhizomes and can be successfully propagated in water.
Preparing for Water Propagation
Before you begin the propagation process, gather the necessary materials:
- Healthy Fern Plant: Choose a healthy fern from which to take cuttings.
- Sharp Scissors or Pruners: Ensure your cutting tools are clean and sharp to prevent damage to the plant.
- Container: Use a clear glass or jar to hold the water and cuttings. A clear container allows you to monitor root growth.
- Water: Use distilled or filtered water to avoid introducing chemicals or contaminants that could harm the fern.
Steps to Root Ferns in Water
- Select and Cut the Fronds: Choose healthy fronds from the fern plant. Ideally, select young, vigorous fronds that are at least 4-6 inches long. Use sharp scissors or pruners to make a clean cut at the base of the frond.
- Prepare the Cuttings: Remove any lower leaves from the frond, leaving a few leaves at the top. This helps reduce moisture loss and allows the plant to focus energy on root development.
- Place the Cuttings in Water: Fill your container with distilled or filtered water. Submerge the cut ends of the fronds in the water, ensuring that the leaves remain above the waterline to prevent rot.
- Provide Proper Lighting: Place the container in a location with bright, indirect light. Avoid direct sunlight, as it can heat the water and damage the cuttings.
- Change the Water Regularly: To prevent stagnation and the growth of bacteria, change the water every few days. This also ensures that the cuttings receive fresh nutrients.
- Monitor for Root Development: After a few weeks, you should start to see roots developing from the cut ends of the fronds. This process can take anywhere from 2 to 6 weeks, depending on the fern species and environmental conditions.
- Transplanting: Once the roots are at least 2-3 inches long, you can transplant the rooted cuttings into a pot with a well-draining potting mix. Water the new plants thoroughly and place them in a location with bright, indirect light.
Care for Newly Rooted Ferns
- Watering: Keep the soil consistently moist but not soggy. Ferns prefer high humidity, so consider misting the leaves regularly.
- Humidity: Ferns thrive in humid environments. If the air in your home is dry, consider using a humidity tray or a humidifier to maintain moisture levels.
- Fertilization: After a month, you can begin to fertilize your ferns with a diluted liquid fertilizer every 4-6 weeks during the growing season.
- Light Requirements: Ensure that your ferns receive bright, indirect light. Too much direct sunlight can scorch the leaves, while too little light can hinder growth.
Common Challenges in Water Propagation
- Rotting: If the cuttings are submerged too deeply or left in stagnant water, they may rot. Ensure that only the cut ends are submerged and change the water regularly.
- Lack of Root Development: If roots do not develop after several weeks, check the water quality and ensure the cuttings are receiving adequate light.
- Pests and Diseases: Monitor your cuttings for signs of pests or disease, such as discoloration or wilting. If you notice any issues, take appropriate action to treat the problem.
Frequently Asked Questions (FAQ)
1. Can all ferns be propagated in water?
Not all ferns are suitable for water propagation, but many popular species, such as Boston ferns and maidenhair ferns, can be successfully rooted in water.
2. How long does it take for fern cuttings to root in water?
Rooting time can vary, but most fern cuttings will develop roots within 2 to 6 weeks, depending on the species and environmental conditions.
3. What type of water should I use for rooting ferns?
Using distilled or filtered water is recommended to avoid introducing chemicals or contaminants that could harm the fern cuttings.
4. How can I tell if my fern cuttings are rotting?
Signs of rot include a mushy texture, discoloration, and a foul odor. If you notice these signs, remove the affected cuttings and replace them with fresh ones.
5. When should I transplant my rooted ferns into soil?
Once the roots are at least 2-3 inches long, you can transplant the rooted cuttings into a pot with well-draining potting mix.
Conclusion
Rooting ferns in water is a rewarding and effective method of propagation that allows plant enthusiasts to expand their collections. By following the steps outlined in this guide and providing proper care, you can successfully propagate ferns and enjoy their beauty in your home or garden. With patience and attention, you can witness the growth and development of these fascinating plants.
Additional Resource
For more information on plant propagation and care, you can visit the U.S. Department of Agriculture (USDA) for valuable resources and guidelines.
| Topic | Details |
|---|---|
| Suitable Fern Species | Boston Fern, Maidenhair Fern, Bird’s Nest Fern, Rabbit’s Foot Fern |
| Water Propagation Steps | Select fronds, prepare cuttings, place in water, provide light, change water regularly |
| Rooting Time | 2-6 weeks |
| Care for Newly Rooted Ferns | Watering, humidity, fertilization, light requirements |
| Common Challenges | Rotting, lack of root development, pests and diseases |